
The task of painting the interior of your home, for the novice painter, may seem to be a challenge, but painting a wall already covered with wallpaper will raise the challenge bar a notch or two. The key problem: removing the existing wallpaper without leaving a surface that resists painting. Here are 3 steps that will make your wallpaper removal a less challenging project.
Step 1 – Determining if Sizing is Present
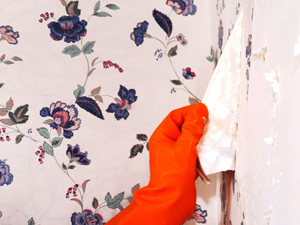
Assuming you were the installer of the wallpaper you wish to remove, try to remember how you originally glued it. Did you use sizing? Did you glue the wallpaper onto a drywall surface? If you don’t remember whether or not you used sizing you’ll need to determine this. To test for sizing, try lifting a corner of the wallpaper. If it comes off the wall easily, you’ll be okay to remove the wallpaper. If it tears, chances are good that you won’t be able to remove it without damage to the drywall surface.
Step 2 – Checking for Releasing Wallpaper
Let’s say you have determined that you should proceed with your wallpaper removal project. You’ll need to then apply steam or wallpaper remover to the wallpaper to loosen it. Before continuing with your wallpaper removal, check the paper for bulges or bubbles that will indicate it is loosening from the wall. If you see these bulges, you should be able to have no trouble removing the old wallpaper. If the bulges are not there, you’ll be wise to simply paint over the wallpaper. But plan to fill the wallpaper seams and apply a primer before painting.
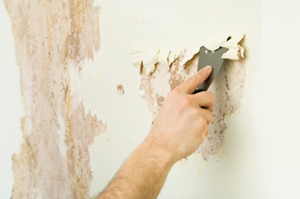
Step 3 – Remove Your Wallpaper
Once you’ve determined that your wallpaper will release from the wall, you can begin wallpaper removal. To be sure it will release properly, wait about ten minutes after applying your steam or wallpaper remover before attempting to pull the old wallpaper from the wall surface. If you wait longer before removing it you’ll risk having it begin to dry (depending on the humidity in the room). If your waiting time is less than 10 minutes your steam or wallpaper remover may not have time to work effectively. When ready to finish your wallpaper removal, begin at a corner. Remove damp glue under the wallpaper, by using a scraper, such as a joint knife or putty knife. Be careful not to scar or damage the drywall with the scraper. If you have dried glue residue remaining on the wall, use a fine grade sandpaper to remove it.
When finished, you’ll be ready to apply your paint primer. Congratulations on completing your wallpaper project. If things get too sticky or difficult – consider hiring a qualified painter who specializes in wallpaper removal.